NEXTDNS CLI
Learn what NextDNS is, what the NextDNS CLI does, how to install it on Windows 10/11, and how to fix common PowerShell execution policy errors.
What is NextDNS?
NextDNS is a cloud-based DNS resolver that adds privacy, security, and customization to your entire internet connection. Instead of simply translating domain names into IP addresses, it acts as a cloud-level firewall blocking ads, trackers, malware, phishing websites, and unwanted domains before they even load.
Native support for DNS-over-HTTPS (DoH) and DNS-over-TLS (DoT).
Selectable blocklists to eliminate tracking and ad networks network-wide.
Real-time protection against phishing, malware, cryptojacking, and typosquatting.
Enforce SafeSearch, block specific apps/websites, and inspect detailed DNS logs.
Official Website: https://nextdns.io →
Dashboard: https://my.nextdns.io →
What is NextDNS CLI?
The NextDNS CLI (Command Line Interface) is a lightweight, open-source client for Windows, Linux, macOS, and router firmware. Instead of relying on heavy graphical apps, it runs quietly as an official system service to securely forward local DNS queries to NextDNS over encrypted channels.
Key Advantages
- Zero GUI Overhead: Consumes minimal CPU and RAM while running headlessly in the background.
- Native System Service: Automatically initializes on Windows boot without requiring manual user login.
- Open Source Security: Audit-ready transparent codebase hosted directly on GitHub.
- Automation Ready: Seamlessly scriptable for system deployment and network administration.
Prerequisites
- Windows 10 or Windows 11 installation
- Administrator PowerShell permissions
- An active NextDNS Account
- Your unique 6-character Configuration ID (found at the top of your NextDNS Dashboard)
Step 1 – Open PowerShell as Administrator
Press the Windows Key, type PowerShell, right-click Windows PowerShell, and select Run as administrator.
Step 2 – Download and Run Installer
Execute the official NextDNS PowerShell installation script:
iwr https://nextdns.io/install -OutFile $env:TEMP\n.ps1
& $env:TEMP\n.ps1
Common Error: Running Scripts is Disabled
On fresh or default Windows installations, PowerShell will block script execution and display a red security error:
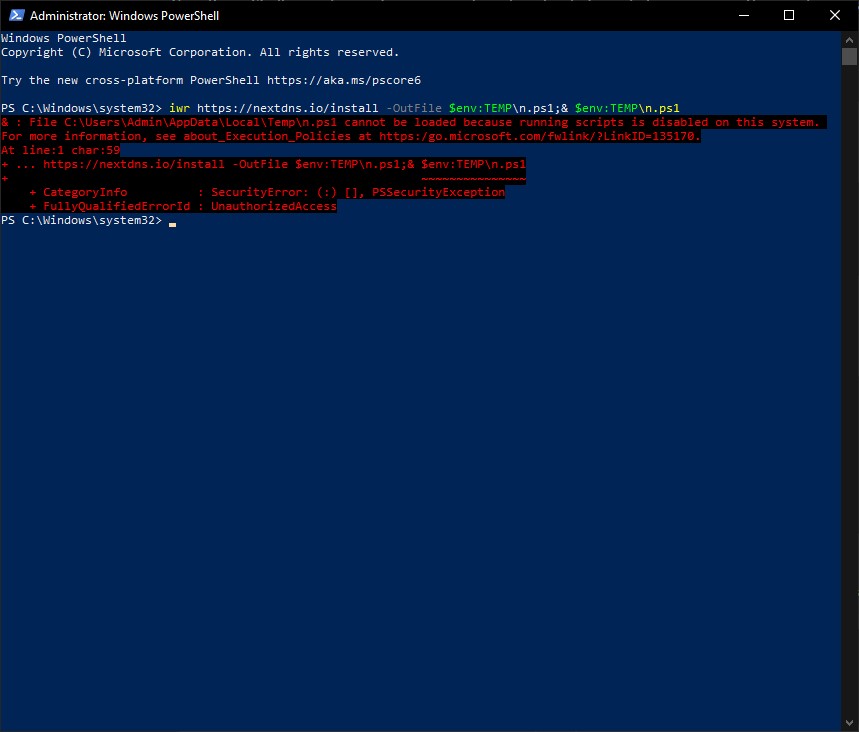
This is caused by the default Windows Execution Policy, designed to prevent untrusted scripts from running automatically.
Temporary Fix (Recommended)
Rather than permanently downgrading system-wide security settings, temporarily bypass the policy strictly for your current PowerShell window:
Set-ExecutionPolicy -Scope Process -ExecutionPolicy BypassPress Y when prompted, then re-run the installer commands:
iwr https://nextdns.io/install -OutFile $env:TEMP\n.ps1
& $env:TEMP\n.ps1-Scope Process limits the policy bypass strictly to your active terminal session. Closing the window immediately restores your system's original security enforcement.
Successful Installation & Configuration
When executed successfully, the installer downloads the binary package, registers the service, and initiates interactive configuration prompts:
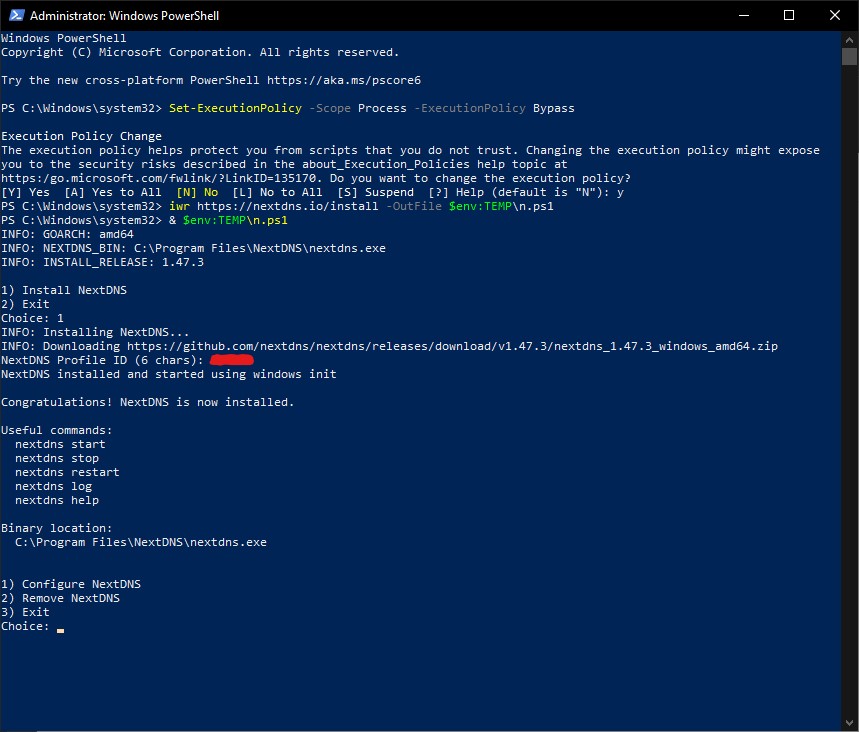
Type 1 to choose Install NextDNS, then enter your 6-character Configuration ID when requested. The client will bind your device and immediately route all DNS queries through your custom NextDNS profile.
Useful Service Management Commands
Manage the NextDNS service at any time from an elevated Command Prompt or PowerShell window:
nextdns status       # Check active running state
nextdns start        # Start the background service
nextdns stop         # Pause the background service
nextdns restart      # Force restart the service
nextdns activate     # Set NextDNS as primary system DNS
nextdns deactivate   # Revert to default router/ISP DNS
nextdns log          # Stream real-time DNS queries
nextdns help         # View full command CLI reference
Verify Setup Integrity
To confirm your device is protected, open your browser and navigate to:
If configured properly, the JSON readout will confirm "status": "using-nextdns" or "ok" along with your current profile ID and device name.